You’ve probably just been dumping data into a spreadsheet like it’s a junk drawer. Clothing receipts next to your cat’s vaccine schedule? No judgement—but let’s fix that. A proper table sorts your mess into something beautiful.
Tables make your data smart. They automatically expand when you add new rows. They format themselves. They even shout, “Hey, I see you typed a date wrong!” Well, sort of.
Step 1: Get your data ready (no, you can’t skip this)
Open Excel. Stare at that blank grid. Feel the power. Now, type your headers in the top row: things like “Name,” “Amount,” “Date.” These are your table’s brain cells.
Don’t leave blank rows or columns inside your data. Excel hates empty spaces. It’ll throw a tantrum and mess up your sorting. Trust me—I’ve seen Excel cry.
Pro tip: Keep your headers short. “Purchased” is better than “The day I bought that weird purple lamp.” Your future self will thank you.
Step 2: The magic button (Insert > Table)
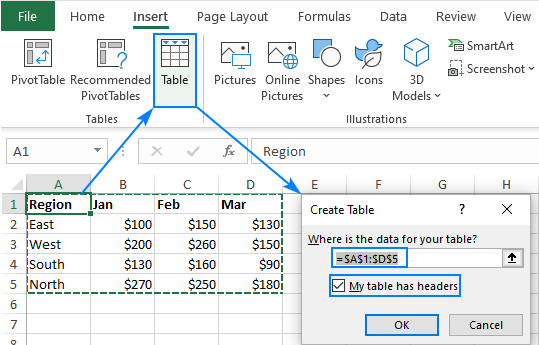
Click anywhere inside your raw data. Now, look at the ribbon—that top menu bar with all the tabs. Go to the Insert tab. Find the Table button (it looks like a tiny grid). Click it.
Excel will guess your data range. It’s usually right, but double-check. And make sure you check the box that says “My table has headers.” If you skip this, Excel will rename your headers to Column1, Column2, and you’ll look like a beginner. Don’t be that person.
Boom! Your data is now a real table. See those drop-down arrows on each header? You can sort A-Z, filter, and feel like a boss. Try it. I dare you.